


In the beginning, there was nothing except a slumbering god. He slept and dreamt, seemingly into infinity, but he woke six times before, every dream a world unto itself -- our world, his seventh dream; his blind sight, our field-of-view algorithm.
So, I've spent what amounts to a day every week to building a solid roguelike core library in Rust. I call it Svarog -- it's a cool name, and can also be interpreted as an all-around roguelike library, because it has "sva" meaning "all" in many Slavic languages, and... "rog" kinda sounds like "rogue"? Scholars, please help out.
Anyway! I've made some progress and wanted to share, so here we go. I plan to make these posts bi-weekly, so please enjoy! This time, let's go for hello world!
Data-driven Loading
There are three painful facts of life when starting out with roguelikes - tilesets, fonts, and grids. I always kinda just do them quickly and get it done, with some amount of hard-coding happening, so I decided to take my time and try to get them to actually be well-planned and in data.
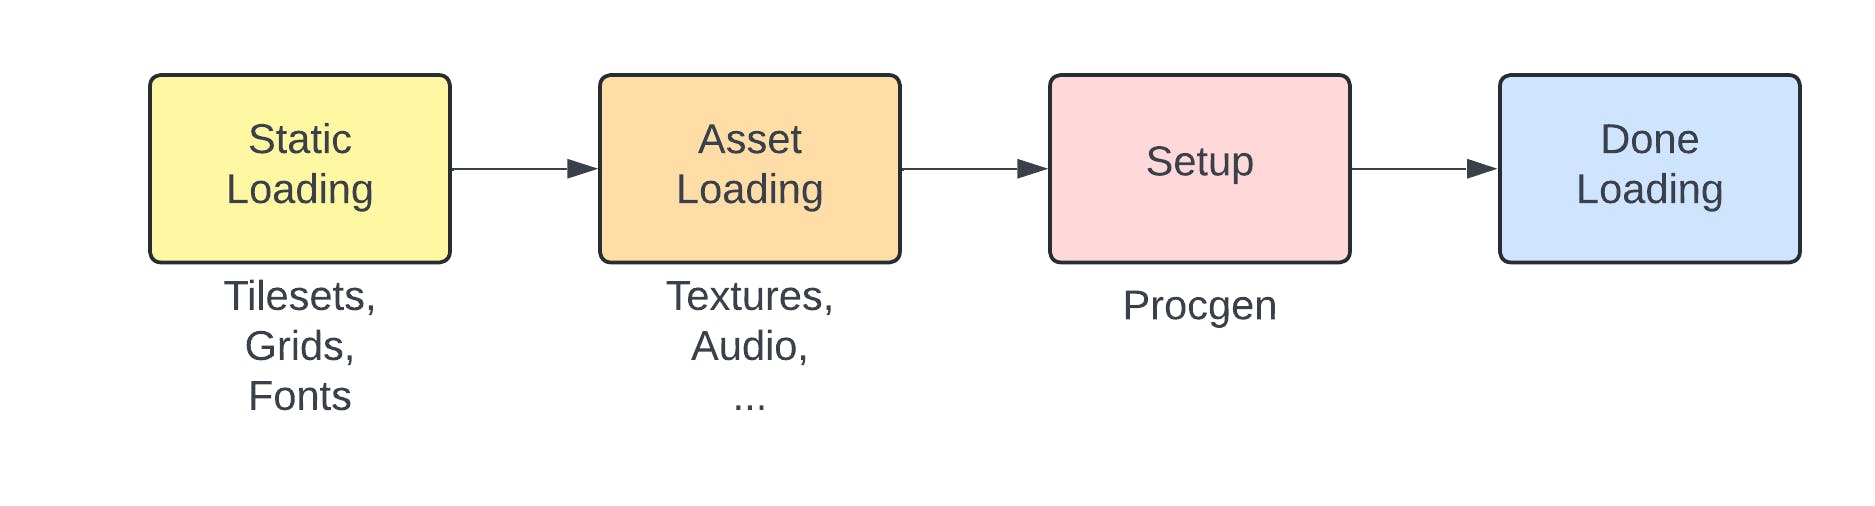
Here's the plan with Svarog: your static resources take care of the painful three from above. They kinda namedrop texture atlases they need, but we leave that for later, where we use Bevy's standard asset loading to load those in, enabling hot reload. After that comes a setup phase, where you can do whatever you like - I mostly tend to either prepare some resources that require everything to have been loaded already, or do procedural stuff. This is a really good spot to use for resets too. Afterwards, we have loaded everything and can now go on with the rest of the game.
Here's the code you need to set this up:
#[derive(Default)]
#[svarog_states]
pub enum GameStates {
    #[default]
    #[static_loading]
    StaticLoading,

    #[asset_loading]
    AssetLoading,

    #[setup]
    Setup,

    #[done_loading]
    Game,
}
The names themselves aren't important, and there's room to add more states for after reading the done_loading state. The only important thing is to tell Svarog which states are the four designated ones. They will be called in the order shown in the image above. You actually don't need to write the loading code, though, for the most part.
You do need to get your tilesets, grids, and fonts in order though. Here's how:
Tilesets

This is my current tilesets.csv file, where I define the three tilesets that I want loaded - this ties the font, texture, and grid details (width, height, column and row number, etc.) with the tileset under a single name.
You can have as many entries in the tilesets CSV as you want, but you can also have any number of tilesets loaded from different CSVs.
Fonts
Font definitions are quite simple:
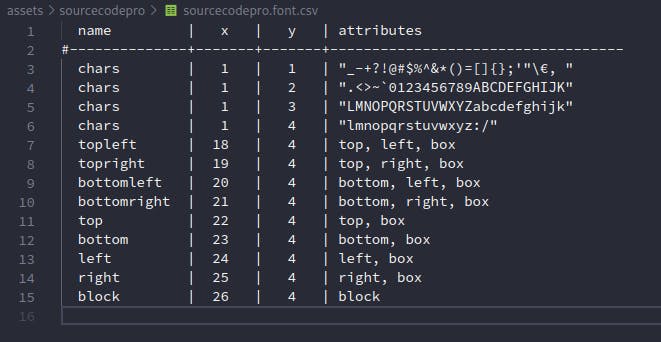
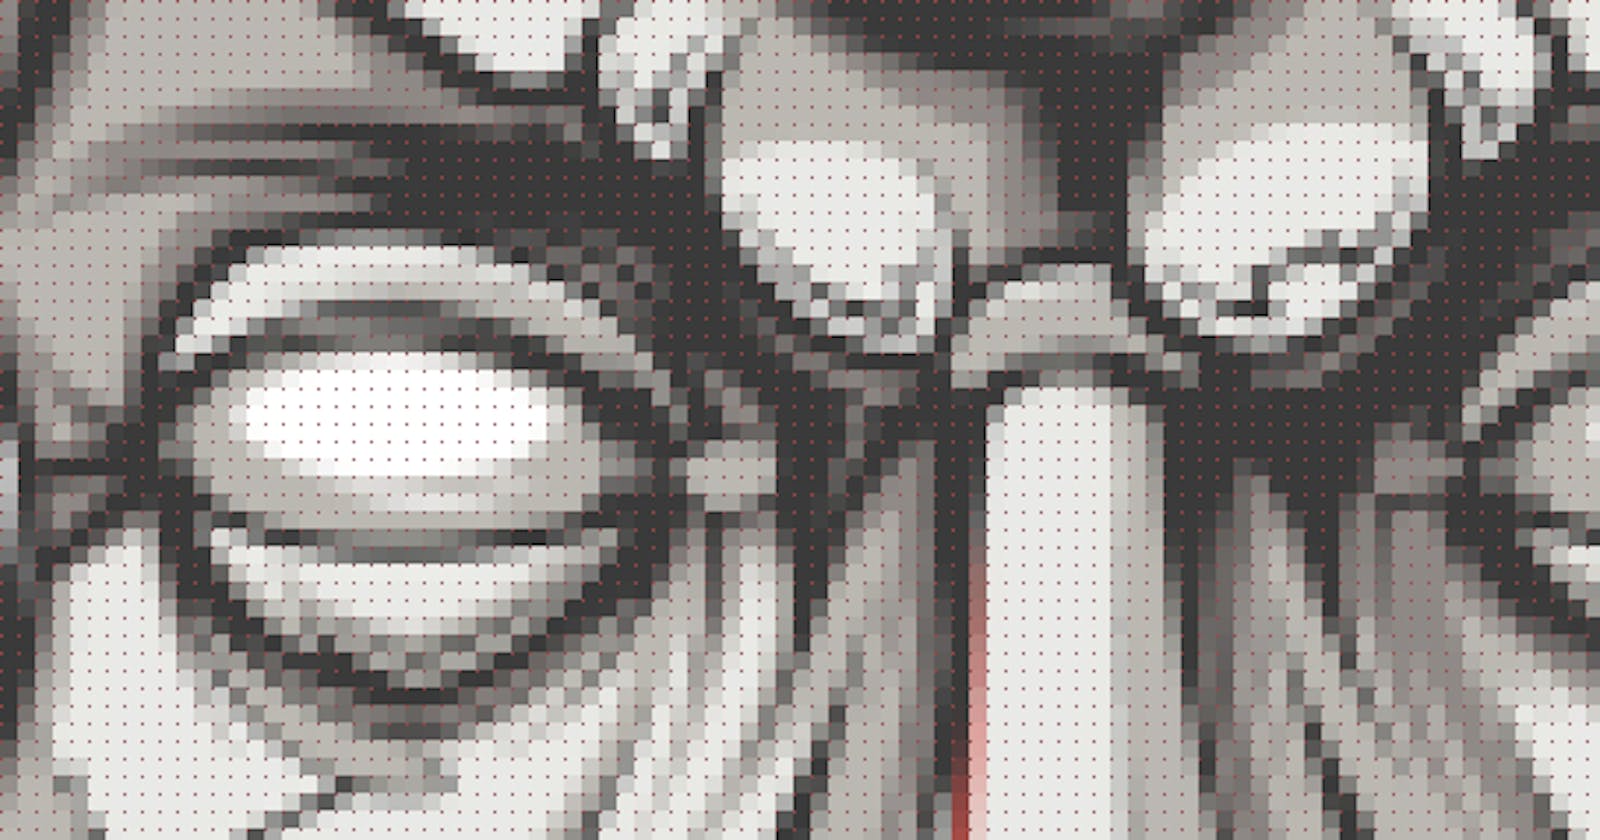
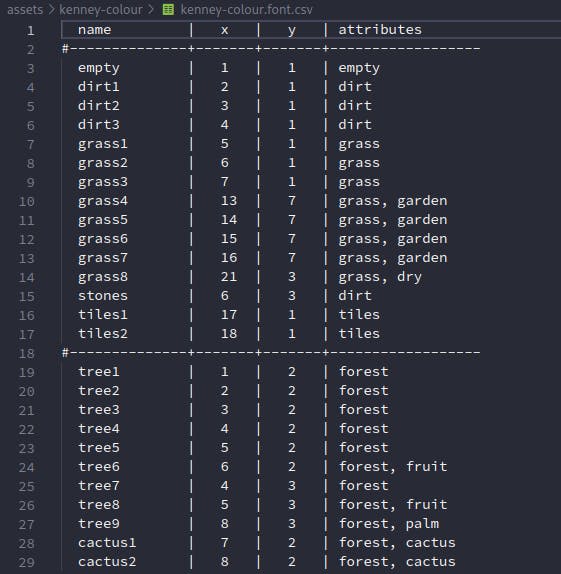
We don't need to use actual pixel sizes here, because we've already told the tileset what our measurements are. We just need to specify what's where. Additionally, there's an attributes section that can be pretty handy and can be used to cheat, like in the picture above: usually, it serves to make finding the right image easy for both search and procedural generation (like if you need something with a wall tag but don't want to choose one exact wall tile), but if the attributes section starts with a quote, Svarog will know you want to actually say "here's a lot of characters that are all in the same line and follow without breaks, and their names are just their chars". To help with understanding the CSV above, here's the image I used:
Lines 3-6 of the CSV will load all the characters into their own, and the rest will then load the special symbols that follow and give them actual attributes.
Here's another example, just to make it easy to follow - this one is for the Kenney 1bit pack:
Here, because there are no characters that I use (although the picture itself does have them), I don't use the quote shortcut. Instead, there's a lot of useful attributes. I'm going to develop a procgen feature later where you can basically say "give me a sprite for a grass, but not garden", and get some of [ grass1, grass2, grass3, grass8 ].
Grids
Lastly, we need to take care of grids:

Grids are sort of self-explanatory - we define their name, width, height, depth (ordering), their origin point (relative to their alignment), the kind (glyph, entity, boolean, for now), tileset (if glyph) and alignment.
Here we load two - one of them to deal with tiles, 200x200 large, at zero depth (will be rendered first), offset so that the (100, 100) tile is in the center of the screen, made of the kenney-colour glyphs from the tileset above. It isn't aligned, meaning that it isn't hooked up to the camera and will be free-flowing. All the other alignments pin the grid to the camera, basically becoming UI.
The uiTL layer (short for "UI, top-left aligned") is a much smaller grid, in the top-left with a 1x1 offset from the origin of the window. All of these measurements are in glyph sizes, read from the tilesets. This layer is in the sourcecodepro tileset, where the tiles are 11x21, and not 16x16 as for the kenney-colour one.
Texture Atlases
Okay, phew, that's a lot of CSVs, but it's done. Now for the texture atlases. We've already seen the pictures exist, now we need to load them in and connect them. Luckily, Bevy has a cool crate for defining asset containers that are loaded in a really cool way, and we just use that. Here's how it works:
#[svarog_texture_atlases]
pub struct TextureAtlases {
    #[asset(key = "kenney-colour")]
    pub kenney_colour: Handle<TextureAtlas>,
    #[asset(key = "kenney-mono")]
    pub kenney_mono: Handle<TextureAtlas>,
    #[asset(key = "sourcecodepro")]
    pub sourcecodepro: Handle<TextureAtlas>,
}
Note the asset(key = XYZ) attributes: this is important as it connects the tilesets and the textures. The last part is to define Bevy's resource asset pack, which is done in a file called resources.assets.ron, which for this example simply looks like this:
({
    "kenney-colour": TextureAtlas(
        path: "kenney-colour/colored_packed.png",
        tile_size_x: 16., tile_size_y: 16.,
        columns: 49, rows: 22,
    ),
    "kenney-mono": TextureAtlas(
        path: "kenney-mono/monochrome_packed.png",
        tile_size_x: 16., tile_size_y: 16.,
        columns: 49, rows: 22,
    ),
    "sourcecodepro": TextureAtlas(
        path: "sourcecodepro/regular.png",
        tile_size_x: 11., tile_size_y: 21.,
        columns: 26, rows: 4,
    ),
})
Again, matching keys to make sure everything fits together like LEGOs. With this, the texture atlases are loaded (in the second phase out of four), and connected.
Code!
From Rust, this is all we need to do to make all of this work:
pub fn load_static_data(
  tilesets: &mut Tilesets,
  fonts: &mut Fonts,
  grids: &mut Grids) {
    // Add all the tilesets and grids here, fonts are autoloaded
    tilesets.add("tilesets.csv", fonts);
    grids.add("grids.csv");
}

pub fn main() {
    // these are the two enums we created above!
    Svarog::<TextureAtlases, GameStates>::default()
        // the loading function above goes here
        .with_loader(load_static_data)
        .run();
}
The .as_bevy() part is where we connect other things in, such as systems that actually do stuff. Most of the grid updates are done using the GridEditor struct, which needs so arbitrary stuff that we just pass in and don't worry:
pub fn randomize_background(
  mut commands: Commands,
  mut grids: ResMut<Grids>,
  mut strings: ResMut<Strings>,
  mut rng: ResMut<RNG>) {
    let mut grid = GridEditor::new(
        &mut commands,
        &mut grids,
        &mut strings);

    let tiles = [
        "dirt1", "dirt2", "dirt3",
        "grass1", "grass2", "grass3", "grass4"
    ];

    for i in 0..200 {
        for j in 0..200 {
            grid.set("tiles", i, j, tiles.rand(&rng));
        }
    }
}
The GridEditor allows us to set a tile at some position of some layer (the tiles layer is used in the example above), but also to print a string, draw a rect or even a box. Here's an example from another system that does just that:
pub fn draw_ui(
  input: Res<Input<KeyCode>>,
  mut commands: Commands,
  mut grids: ResMut<Grids>,
  mut strings: ResMut<Strings>,
  mut counter: Local<i32>) {
    let mut grid = GridEditor::new(
      &mut commands,
      &mut grids,
      &mut strings);

    if input.just_pressed(KeyCode::Space) {
        *counter += 1;
        grid.boxed("uiTL", 0, 0, 15, 10, &[
            "topleft",
            "topright",
            "bottomleft",
            "bottomright",
            "top", "bottom",
            "left", "right",
            " " ]);
        grid.print("uiTL", 3, 0, &format!(" COUNT: {} ", *counter));
        grid.print("uiTL", 2, 2, "C:>/block//x/");
        grid.set("uiTL", 6, 2,
            if *counter % 2 == 0 { "block" } else { "" });
    }
}
The boxed method uses a slice of tile names to draw the box in a 9-slice fashion. The print method accepts strings but can also print special characters via the // notation. For example, "C:>/block//x/" means that we want to print C:> as a string, then the block tile as a separate character, followed by the x tile (which is the same as the x character by itself). This notation also nicely escapes the / symbol itself: if you type //, while in string mode, it will end up being a / character in the game.
Connecting these functions to bevy is nothing new and basically non-Svarog specific:
pub fn main() {
    // these are the two enums we created above!
    Svarog::<TextureAtlases, GameStates>::default()
        .with_loader(load_static_data)
        .as_bevy()
        .add_systems(Update, (randomize_background, draw_ui)
                           // ^-- chain these if working on same grid
            .run_if(in_state(GameStates::done_loading_state())))
        .run();
}
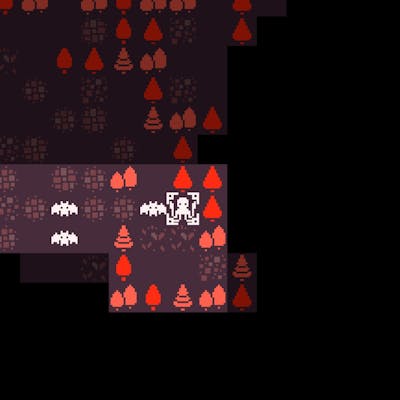
Here's what we have with these systems in the game and all the data nicely loaded:

Hopefully, you like what you see! In two weeks, I hope to tell you about REXpaint loading, and some cool gameplay library features. In the meantime, there'll be a text on a deeper dive into the rendering process and how it plays with ECS.
Until then, stay rusty, be hyped, and rogue like there's no tomorrow!